Wooden bracing elements used to fill in gaps or empty spaces can often be made quickly and simply. Occasionally, however, they are feats of craftsmanship that require a great deal of experience and ability.
 |
 |
||
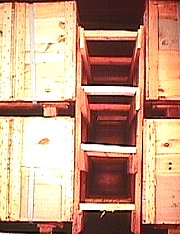
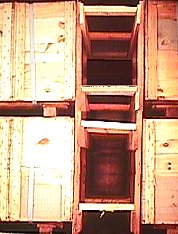
| Horizontally bracing, poorly placed in part | Well placed horizontal bracing elements |
The important issue when bracing is that the forces must be transferred to the load-bearing components of the cargo transport unit or the packaged items that surround the gap. From a technical point of view, the bracing elements in both examples are equally well made. Horizontal elements are nailed onto vertical elements. The bracing elements are formed by the wooden beams that are cut to fit and placed transversely on top. The majority of this work can be done in advance outside the CTU. Only the bracing must be put in place inside the container. The advantage of the method shown on the right is that the bracing elements are placed level with the strongest parts of the cases, namely the top and the bottom.
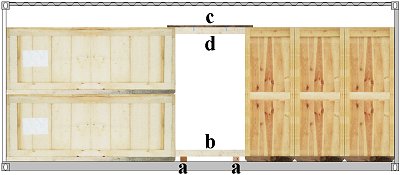
This form of bracing (see the next figure) assumes that the packages either side of the gap are of almost identical height. Two transverse lengths of squared lumber are placed on the floor at the bottom of the space (a); depending on the forces that can be expected, at least two or more pieces of lumber are cut to fit and placed horizontally (b). Outside the transport unit, boards are prepared (c) which can then be nailed to the fitted lumber beams (d). This prepared bracing element is then lowered into place from above. All elements are stapled in place to prevent them from moving or are cross-braced with wooden boards.
 |
|
| Tight-fit using a very simply made form of bracing |
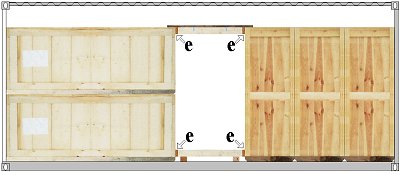 |
Using squared lumber fitted into a space in the way shown above is only possible if the packaged items are able to withstand such point loading. If the cases are not strong enough to allow the ends of the bracing beams to be placed against them directly, boards (e), planking or squared lumber can be additionally used to distribute the load forces. If this is not sufficient, vertical bracing elements or other methods of bracing should be used. The section on wood contains a number of other useful tips, as well as rules of thumb for calculating strength. Additional tips can also be found in the examples.
 |
|
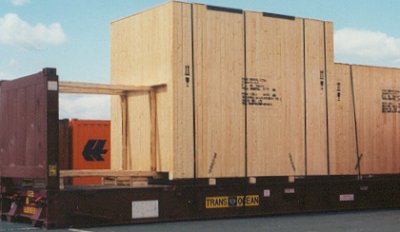
| Bracing an overheight case on a 40' flatrack |
The traffic lights here are on amber. There are a number of things to bear in mind with regard to the woodwork and the lashing that have been used here. This picture is only designed to indicate the wide range of bracing methods that can be used to create a tight fit.
It is often the case that insufficient attention is paid to the bracing of gaps and/or the work is carried out in an unprofessional manner:
 |
 |
|
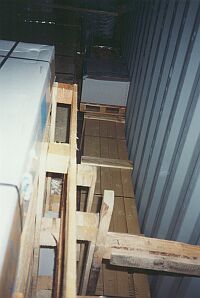
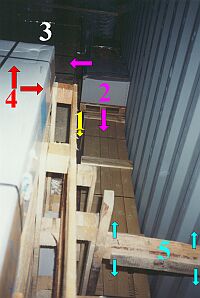
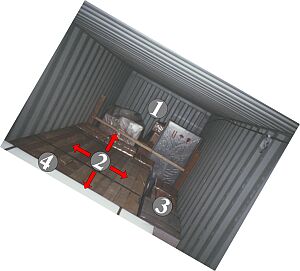
| Badly braced spaces in a container | ||
Space 1 allows the packaged items to slide around on the floor. Package 2 can slide both in the direction of the door and in the direction of the space. Package 4 can move forward into space 3 or escape to the side. Bracing element 5 is able to shift upward and downward on the right, and as a result of point loading may even damage the wall of the container. On the left, the bracing is able to move in all directions because it has not been fixed into place.
Neat packing and the professional use of beams and boards enables the remaining gaps to be braced without subjecting parts of the load or the container walls to point load forces.
 |
||
| An example of professional bracing | ||
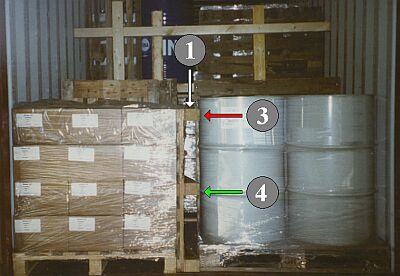
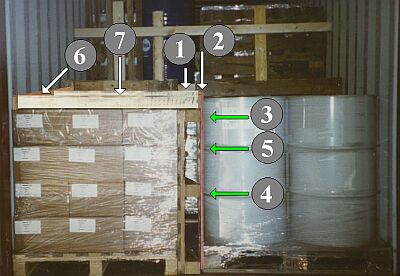
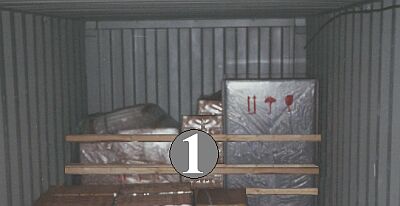
The picture shown here is of a stuffed container destined for an international voyage carrying, among other things, dangerous goods. In accordance with legal requirements a signed container packing certificate was available which testified that the container had been correctly packed and that the load had been secured adequately. It is difficult to believe that anyone could possibly issue this certificate for the load shown here.
The provisional bracing of the gap with a pallet (1) is not sufficient.
 |
||
| Goods are put at risk by provisional filling using a pallet | ||
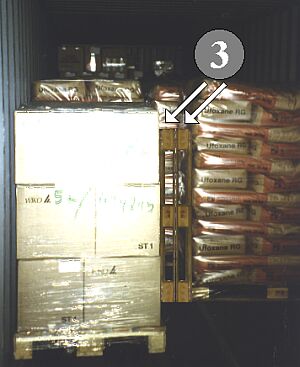
The red arrow (3) shows the foot of the pallet putting pressure on the wall of the drum. The cartons are not strong enough to ensure that they will survive without damage. The green arrow (4) shows where forces can be transmitted via the corrugations of the drum.
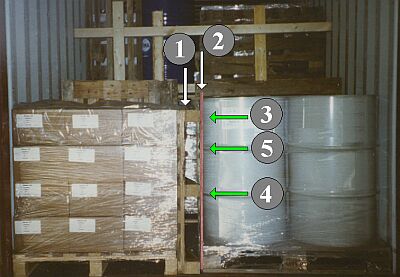
In order to ensure an even distribution of forces, walking boards, chipboard or hardboard (2) are required in addition to the pallet (1).
 |
||
| Filling in a space using a pallet and plywood | ||
|
Key: (1) = Pallet placed vertically; (2) = Plywood board placed vertically; (3) Transmission of forces to the drum; (4) and (5) = Transmission of forces at the corrugations of the drum. |
||
This alone is not sufficient to provide 100% protection from damage. An important factor is that the forces from the drums are absorbed at the top of the boxes.
This can be achieved by laying pallets on top of the cartons in conjunction with squared lumber or using a simple construction made of squared lumber and boards. The latter can be prepared outside the container and then put into place.
 |
 |
|
| Different bracing elements | ||
The option of boards (6) plus squared lumber (7) was used for the load shown here, which meant that the forces were transmitted to the top rims of the drums.
 |
||
| Absorbing the forces at the top of the goods in cartons | ||
Every space in the load represents an increased risk of danger. Spaces should therefore always be filled in.
 |
Badly wrapped pallets and spaces in the load |
| Filling in spaces in the load using two pallets |
 |
With goods that are liable to topple or palletized goods, as in (1) and (2), that are badly bonded to the pallet, it is not only the floor region which must be filled out, but a greater surface area as shown in the picture on the right where two pallets have been used for this purpose (3).
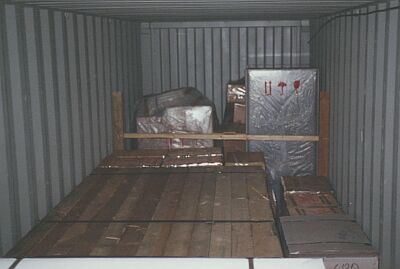
At a first glance, the container looks relatively well packed:
 |
||
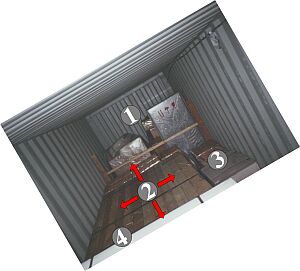
| Faults in a container packed for export | ||
The heavy case has not been braced at floor level. The forces from the case are able to work in all horizontal directions. Depending on the method of transportation and the forces that occur as a result, the cartons at the front (1), side (3) or rear (4) can be damaged by the case (2) or may even be crushed completely.
 |
 |
Here a roll angle of 30° is shown. Such transverse forces occur when a container is transported on a ship in the usual fashion, namely with fore and aft stowage. To put the risks in perspective, it can be assumed that on a long voyage a container will be subjected to several tens of thousands of these roll oscillations. During pre- and post-carriage by rail or by road, the objects in front of or behind the case are the ones most at risk. The same would apply if the container was to be stowed athwartships on the vessel.
The possibility of the packages being crushed could have been avoided by using squared lumber in the floor region between the case and the sides of the container.
 |
 |
|
| View from the top | View from the side | |
| Frame used to brace a case against the end wall of the container |
||
The squared lumber beams (a) lying lengthways are designed to brace the case which has yet to be loaded. They are raised (c) in such a way that the case is braced at the level of the bottom of the case. Squared lumber or boards are placed at the end wall of the container and the front end of the case; these serve to distribute the load forces (b).
 |
The cartons and pallets of batch (1) are then loaded into this section of the container and secured appropriately above the height of the case that is still to be loaded.
Once the case has been loaded, the space at the right of the container can then be braced:
 |
||
| Bracing in the space at the right of the container - Plan view | ||
The wooden bracing elements (d) and the wooden beams that are designed to distribute the load forces (e) are raised by beams placed below them to the extent that the frame is at the same level as the robust bottom of the case. The number of wooden elements used to form the bracing will depend on the weight of the case and can be calculated using a rule of thumb. For each square centimeter cross-section of a wooden element, a force of 30 daN can be absorbed.
The next two images illustrate more clearly how the frame is raised using wooden elements (f).
 |
||
| Bracing in the space at the right of the container - View from the right |
||
 |
||
| Bracing in the space at the right of the container - View from the door |
||
If cases are at risk of tipping, they must also be braced close to the lid of the case. This is not necessary in this particular instance.